How to change DNS server settings on Windows 7 and above
The DNS system is what allows your computer to find out where the websites you want to visit are hosted. The DNS settings on your device allows you to choose what DNS servers you with to use. There are a few factors that go into choosing a server, like speed and security. Let's jump in!
Alternatively, you can watch the video below for a step by step guide.
Why should I change my DNS server settings?
Most people chose to change their DNS settings because the default DNS servers (Generally set to use your ISP's DNS servers) can be slow, and in some cases, incorrectly configured for caching and security. Such configuration can possibly slow down your internet connection speed. Additionally, Your default DNS servers may not offer phishing protection and support for DNSSEC. Lastly, most ISP's use their DNS servers as an additional way to track and monitor your internet usage.
List of the most popular DNS servers
Now that you've learned why you should you change your DNS server, below is a list of options that you can choose from! Majority of the time your system will take the IPv4 address of the DNS server. If you need the IPv6 address, we will add it below as well.
IPv4 (Most Commonly Used)
| Server Provider | Primary Server | Alternative Server |
|---|---|---|
| CloudFlare (Recommended) | 1.1.1.1 | 1.0.0.1 |
| 8.8.8.8 | 8.8.4.4 | |
| OpenDNS | 208.67.222.222 | 208.67.220.220 |
| Quad9 | 9.9.9.9 | 149.112.112.112 |
IPv6
| Server Provider | Primary Server | Alternative Server |
|---|---|---|
| CloudFlare (Recommended) | 2606:4700:4700::1111 | 2606:4700:4700::1001 |
| 2001:4860:4860::8888 | 2001:4860:4860::8844 | |
| OpenDNS | 2620:119:35::35 | 2620:119:53::53 |
| Quad9 | 2620:fe::fe | 2620:fe::9 |
Advertisement

How to change your DNS server
In this section, we will change our default DNS server to a new one.
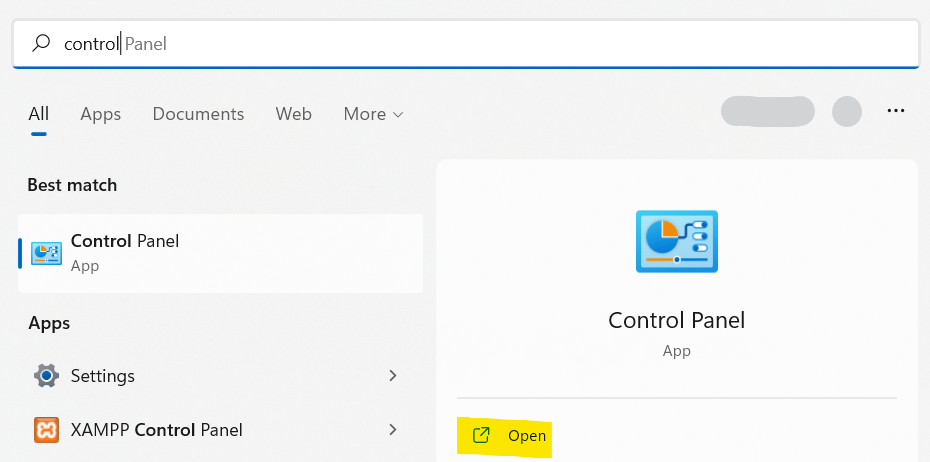
- First, launch the Control Panel (Click the Windows Icon and search "Control Panel")
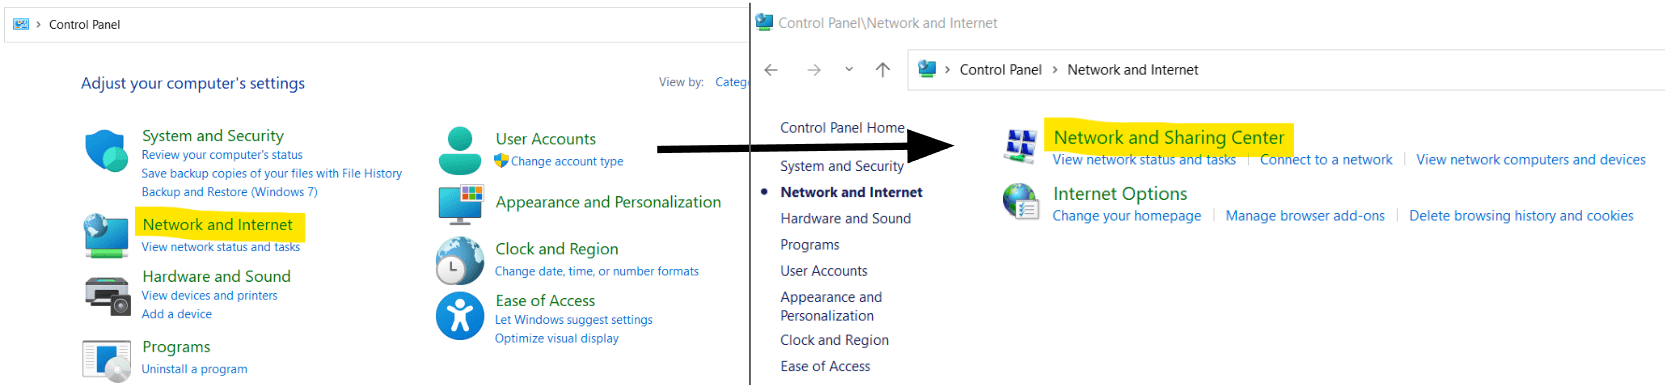
 3. In the control panel, navigate to to "Network and Internet", then "Network and Sharing Center"
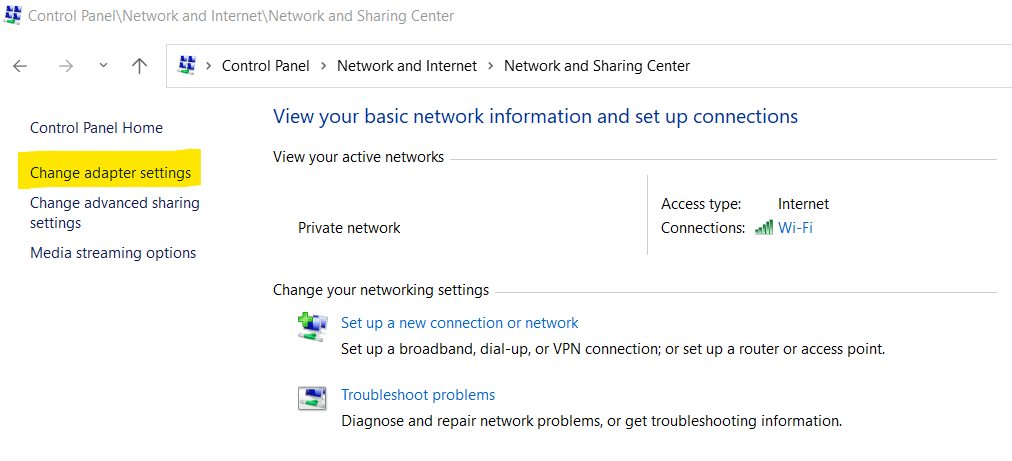
 5. Select "Change Adapter Settings" from the left side of the control panel
 7. Select the network that your are currently using (Most likely "Wi-Fi" or "Ethernet")
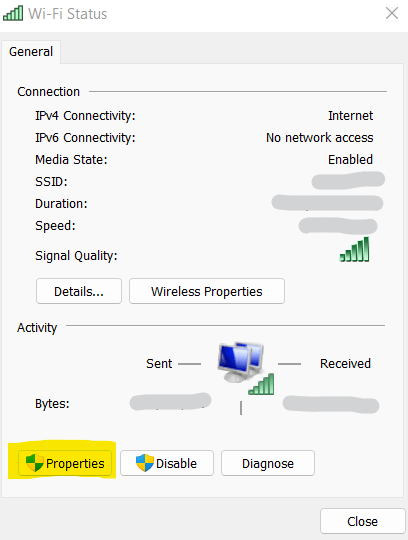
 9. Select the "Properties" button. You may have to provide an administrator password
In the new window that opens, select either "Internet Protocol Version 4 (TCP/IPv4)" or "Internet Protocol Version 6 (TCP/IPv6)", whichever appears in the list (Note: Only one will appear, not both)
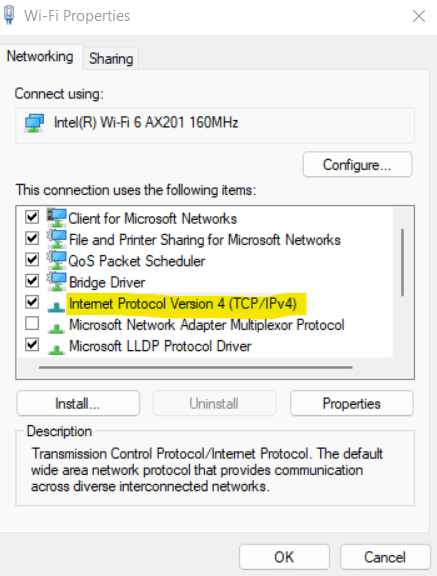 13. Only you have highlighted the selection from the above step, select "Properties"
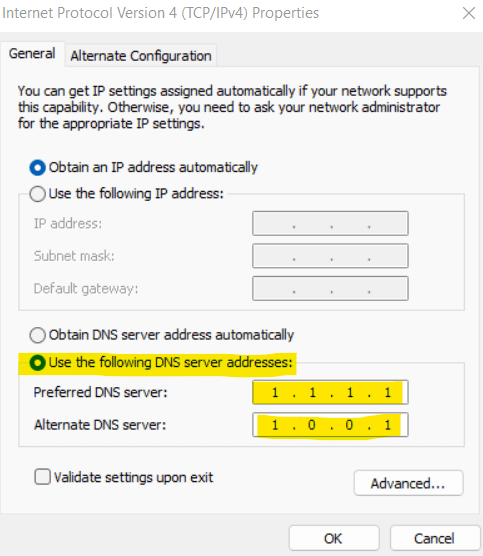
- If it is not selected, choose the "Use the following DNS server addresses:" radio button
- For "Preferred DNS server", enter the "Preferred DNS server" from above, for example, 1.1.1.1 (For Cloudflare)
- For "Alternate DNS server", enter the "Alternate DNS server" from above, for example 1.0.0.1 (For Cloudflare)
Select the "OK" button on the current window, then the "Close" button on the other windows to exit
You can now close the control panel. You have now changed the DNS server on your computer, congratulations!
How to Clear Your DNS Cache
While all new DNS queries will be sent using your new DNS settings, you may want to clear all existing records. If you do, see the three quick steps below.
- Open a Command Prompt window by clicking on Start and searching for "cmd".
- Once the Command Prompt is open, type:
ipconfig/flushdns - Press the enter key.
- That's it!
Conclusion
That's it! After following all the steps, you've changed your DNS server and are on your way to having a faster and more secure browsing experience. Once again, congrats and happy browsing!
Advertisement

Article Author
Related Articles
Nameservers are part of the DNS (Or Domain Name System) and are used to control your domain and its contents. Nameservers tell the visitors browser where the web server is located, so the website can ...
Advertisement